The Student's Guide to Selling Online with WordPress
From installing your first website to making your first sale: a complete, no-nonsense guide built for students.

You've got a product, a skill, or an idea. Maybe you're selling handmade items, digital downloads, photography presets, tutoring services, or second-hand textbooks. Whatever it is, the internet gives you a massive audience, and you don't need a business degree or thousands of dollars to reach them.
This guide walks you through everything you need to start selling online as a student using WordPress, the world's most popular website platform. We'll go from buying your first hosting plan all the way to accepting your first payment.
Short on time or don't want the technical setup? Skip to the end of this guide to learn how Instuly Marketplace lets you start selling in minutes, no website required.
Step 1: Understand What You're Building
Before clicking any buttons, it helps to understand the two main tools you'll be using:
- WordPress is a free, open-source content management system (CMS) that powers over 43% of all websites on the internet. You install it on a server and use it to build and manage your site.
- Shared Hosting is an affordable type of web hosting where your website lives on a server shared with other sites. It's the ideal starting point for students because it costs as little as $2–5 per month.
Together, these two tools give you a fully functioning website that you own and control completely.
Step 2: Choose a Domain Name and Hosting Plan
Picking a Domain Name
Your domain name is your website's address. For example, yourname.com. Here are a few tips for choosing one:
- Keep it short and easy to spell
- Use your name, brand, or what you sell (e.g., craftsbyjamie.com)
- Stick to .com if possible; it's the most trusted extension
- Avoid numbers, hyphens, and slang that date quickly
💡 Student Tip: Many hosting providers include a free domain for the first year when you sign up for a hosting plan.
Choosing a Shared Hosting Provider
For students, the best shared hosting providers balance price, performance, and ease of use. Popular options include:
- Hostinger: Often the cheapest option, starting around $2–3/month with a beginner-friendly dashboard
- Bluehost: Officially recommended by WordPress.org, good support, slightly pricier
- SiteGround: Known for excellent speed and customer support, a great mid-tier option
When signing up, look out for introductory pricing (which renews at a higher rate), SSL certificate inclusion (essential for security), and one-click WordPress installation.
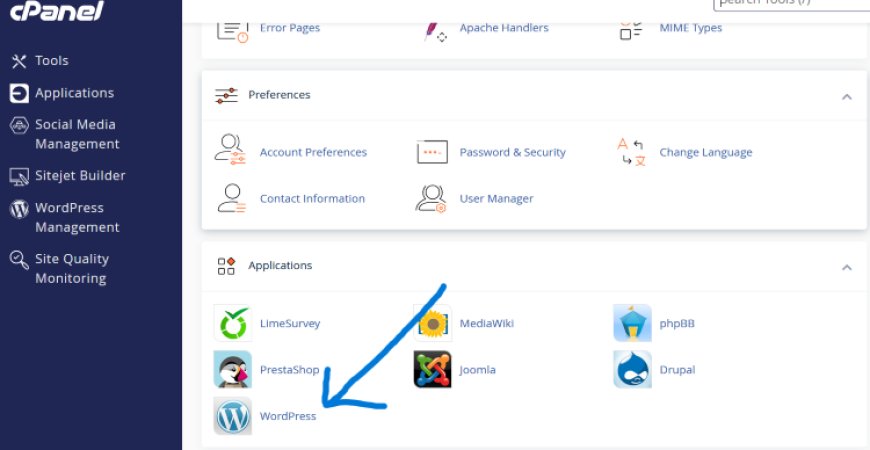
Step 3: Install WordPress on Your Hosting Account
Once you've signed up for hosting and registered a domain, it's time to install WordPress. Most modern hosts make this incredibly easy.
One-Click Installation (Recommended)
Log in to your hosting control panel (cPanel, hPanel, or similar). Look for a section called 'WordPress Installer', 'Auto Installer', or 'Softaculous Apps Installer'. Click 'Install WordPress', fill in your site name, admin username, and password, then click Install. Within a few minutes, WordPress will be live at your domain.
💡 Pro Tip: Write down your WordPress admin URL (usually yourdomain.com/wp-admin), username, and password somewhere safe. You'll need these every time you log in.
Logging Into Your WordPress Dashboard
Visit yourdomain.com/wp-admin and enter your credentials. You'll land on the WordPress Dashboard, your command centre. From here, you can manage pages, posts, plugins, themes, and settings.
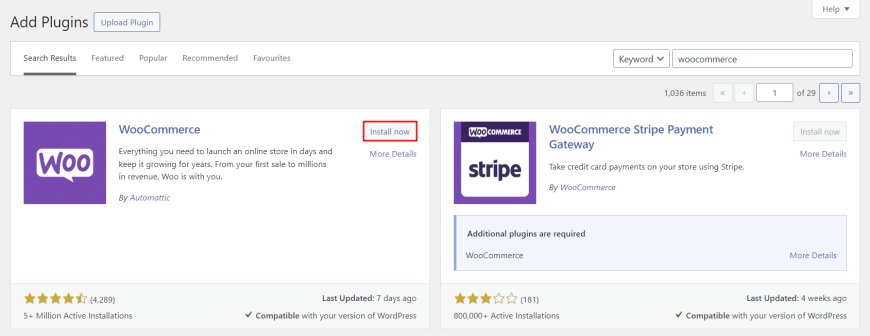
Step 4: Set Up Your Online Store with WooCommerce
WooCommerce is the go-to plugin for turning a WordPress site into a fully functional online store. It's free, trusted by millions of businesses, and integrates with almost every payment gateway and shipping provider available.
Installing WooCommerce
From your WordPress Dashboard: go to Plugins > Add New, search for 'WooCommerce', click Install Now, then click Activate. WooCommerce will launch a Setup Wizard to guide you through the basics.
WooCommerce Setup Wizard
The wizard will ask you a few key questions:
- Store details, your location, currency, and what you plan to sell
- Payment methods, Stripe and PayPal, are recommended for students as they're easy to set up and widely trusted
- Shipping, Set your delivery zones and rates (or 'free shipping' if you're selling digital products)
- Tax settings, WooCommerce can handle basic tax calculations automatically
💡 For digital products: Enable 'Virtual' and 'Downloadable' when adding products; this disables shipping and lets customers download instantly after purchase.
Adding Your First Product
Navigate to Products > Add New. Give your product a clear, descriptive title. Write a compelling description that answers: what it is, who it is for, and why they should buy it. Add high-quality images, set your price, and click Publish. Your product is now live.
Step 5: Choose a Theme That Looks Professional
Your website's theme controls its appearance. WordPress has thousands of free and premium themes. For a student-run store, a clean, fast-loading theme is more important than a flashy one.
Good free options include Storefront (built by the WooCommerce team and optimised for it), Astra (lightweight and highly customisable), and Kadence (modern design with great free blocks).
Install a theme via Appearance > Themes > Add New. Search, install, and activate, then customise your logo, colours, and layout via Appearance > Customise.
💡 Keep it simple: A clean, fast website converts better than a complicated one. Focus on clear product images, easy navigation, and a visible 'Add to Cart' button.
Step 6: Essential Plugins to Install
Beyond WooCommerce, a few other plugins will significantly improve your store's performance, security, and visibility:
Yoast SEO or Rank Math
Search engine optimisation (SEO) helps people find your store on Google. These plugins guide you through optimising each page and product for search, crucial for long-term, free traffic.
Wordfence Security
A free security plugin that protects your site from hackers, malware, and brute-force login attacks. Install it as soon as your site goes live.
WP Super Cache or LiteSpeed Cache
Speed matters, both for user experience and Google rankings. A caching plugin stores static versions of your pages, dramatically reducing load times.
UpdraftPlus
Automatically backs up your website to Google Drive or Dropbox. Losing your site with no backup is every website owner's nightmare; this prevents it for free.
WooCommerce Stripe Payment Gateway
If you chose Stripe during setup, install this official plugin to accept credit and debit card payments directly on your site without redirecting customers away.
Step 7: Launch, Promote, and Grow
With your store set up, it's time to attract buyers. As a student, your best assets are authenticity, creativity, and the communities you already belong to.
- Social media: Share your products on Instagram, TikTok, Pinterest, or wherever your audience hangs out. Short videos showing your product in use often outperform polished ads.
- Student communities: Post in Facebook groups, Discord servers, and campus forums. Fellow students are often your most supportive first customers.
- Email list: Install a plugin like Mailchimp for WooCommerce to collect emails and stay in touch with customers for repeat sales.
- Google Business Profile: If you sell locally or offer services, a free Google Business Profile gets you appearing in local search results.
💡 Start small: Don't wait until everything is perfect. Launch with 3–5 products, get feedback from real customers, and improve as you go.
🛒 The Zero-Hassle Alternative:
Sell on Instuly Marketplace: No Website Needed
Setting up a WordPress site is one of the best long-term investments you can make as a student entrepreneur. But we understand, not everyone has the time, budget, or technical confidence to manage a website right now. If that's you, there's a smarter shortcut.
Instuly Marketplace is a full transactional marketplace built for exactly this kind of seller. List your products, and Instuly handles the infrastructure, payments, checkout, and customer management, all taken care of. You just focus on selling.
Why Students Love Instuly
- No hosting fees, no plugins to configure, no theme to design, just create a free account and start listing
- Full transaction handling built in, accept payments from buyers without needing to set up a payment gateway yourself
- Get in front of an existing audience of buyers already browsing the marketplace
- Perfect for students testing a product idea before committing to a full website build
Amplify Your Sales with the Instuly Affiliate Network
Here's where it gets really exciting for student sellers: Instuly's affiliate network lets you recruit other people, fellow students, friends, social media followers, to promote your products for a commission.
This means your store's reach grows beyond just the people you know. Affiliates share your product links with their own audiences, and every time someone buys through their link, they earn a small percentage, and you earn the sale. It's a win-win growth engine that costs you nothing unless it generates revenue.
- Set your own commission rates to attract motivated affiliates
- Track every referral and sale through your Instuly dashboard
- Scale your income without scaling your marketing budget
💡 Student Hack: Ask classmates, campus influencers, or friends with social media followings to become your affiliates. Give them a fair commission and watch your reach multiply overnight.
Ready to list your first product? Visit my.instuly.com and create your free seller account today.
Starting an online business as a student is one of the best decisions you can make. You're in an environment that encourages learning, experimentation, and calculated risk, and the cost of failure has never been lower.
Whether you choose to build your own WordPress store and grow it into something truly yours, or start quickly with Instuly Marketplace and use the affiliate network to reach buyers faster, the most important step is the first one.
You don't need to be a developer. You don't need thousands of followers. You don't need a perfect product. You just need to start.
What's Your Reaction?
 Like
0
Like
0
 Dislike
0
Dislike
0
 Love
0
Love
0
 Funny
0
Funny
0
 Wow
0
Wow
0
 Sad
0
Sad
0
 Angry
0
Angry
0
Instuly is the go-to website to discover side hustle ideas, tech and marketing skills, and ways to earn money as a student.